

Integrazione del gateway di pagamento Stripe in Laravel
Se gestisci un negozio online o un qualche tipo di servizio a pagamento, probabilmente devi accettare pagamenti con carta di credito sulla tua domanda. Stripe è uno dei gateway di pagamento più diffusi che accettano pagamenti con carta di credito o di debito online. Inoltre, l’utente non ha bisogno di lasciare il tuo sito web per effettuare il pagamento con carta. In questo articolo, studiamo l’integrazione del gateway di pagamento Stripe in Laravel.
Per integrare il gateway Stripe in Laravel utilizzeremo la libreria Omnipay che è popolare tra gli sviluppatori. Quindi, senza ulteriori indugi, iniziamo con la nostra integrazione.
Ottieni chiavi API per l’integrazione con Stripe
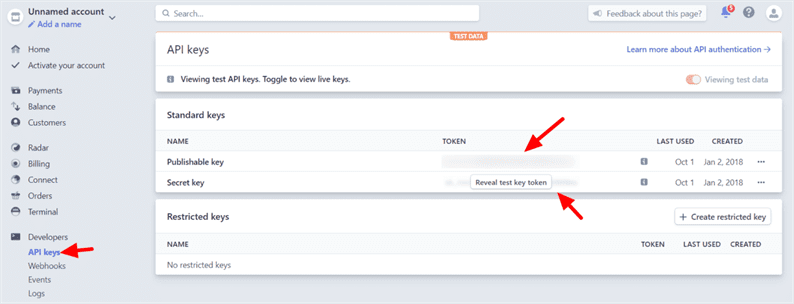
All’inizio, devi creare un account Stripe se non ne hai già uno. Per integrare il gateway Stripe devi prima prendere la tua chiave segreta e pubblicabile. Otterrai queste chiavi dalla pagina Sviluppatori->Chiavi API.
Si consiglia sempre di testare prima le transazioni online con le chiavi sandbox e, se tutto funziona bene, utilizzare le chiavi live.
Configurazione di base in Laravel per l’integrazione con Stripe
Prima di iniziare ad accettare pagamenti online utilizzando Stripe, devi eseguire una configurazione di base. Avremo bisogno di chiavi stripe durante l’integrazione API, quindi aggiungi queste chiavi nel .envfile.
STRIPE_PUBLISHABLE_KEY=PASTE_PUBLISHABLE_KEY
STRIPE_SECRET_KEY=PASTE_SECRET_KEY
STRIPE_CURRENCY=USD
Ogni volta che aggiungiamo nuove costanti nel file di ambiente, dovremmo eseguire il comando seguente per cancellare la cache di configurazione.
php artisan config:cacheQuando si tratta di pagamenti online, è necessario memorizzare i dettagli della transazione nel database. Per questo, crea una migrazione usando il comando:
php artisan make:migration create_payments_tableNel file di migrazione modificare il upmetodo come segue:
public function up()
{
    Schema::create('payments', function (Blueprint $table) {
        $table->bigIncrements('id');
        $table->string('payment_id');
        $table->string('payer_email');
        $table->float('amount', 10, 2);
        $table->string('currency');
        $table->string('payment_status');
        $table->timestamps();
    });
}
Quindi, esegui il comando seguente per eseguire la migrazione.
php artisan migrateRichiederemo un modulo HTML in cui un utente può inserire i dettagli della propria carta e altre informazioni. Crea un payment.blade.phpfile e aggiungi il codice qui sotto.
<link rel="stylesheet" href="{{ asset('/css/style.css') }}" />
<script src="https://js.stripe.com/v3/"></script>
<form action="{{ url('charge') }}" method="post" id="payment-form">
    <div class="form-row">
        <p><input type="text" name="amount" placeholder="Enter Amount" /></p>
        <p><input type="email" name="email" placeholder="Enter Email" /></p>
        <label for="card-element">
        Credit or debit card
        </label>
        <div id="card-element">
        <!-- A Stripe Element will be inserted here. -->
        </div>

        <!-- Used to display form errors. -->
        <div id="card-errors" role="alert"></div>
    </div>
    <button>Submit Payment</button>
    {{ csrf_field() }}
</form>
<script>
var publishable_key = '{{ env('STRIPE_PUBLISHABLE_KEY') }}';
</script>
<script src="{{ asset('/js/card.js') }}"></script>
Nel file blade, abbiamo incluso direttamente i file CSS e JS. Puoi includerlo in un altro modo secondo il flusso del tuo progetto. Infine, definire i percorsi come segue.
route/web.php
Route::get('/payment', 'PaymentController@index');
Route::post('/charge', 'PaymentController@charge');
Creeremo il controller PaymentControllernei passaggi successivi.
Genera elementi della carta a strisce
Stripe fornisce i propri componenti dell’interfaccia utente predefiniti che raccolgono i dati delle carte dei clienti in modo sicuro senza gestire dati sensibili. I dettagli della carta vengono convertiti in "Token" che deve quindi essere inviato ai tuoi server. Usando questo ‘Token’ puoi addebitare i clienti. Questo è un modo sicuro in quanto la tua applicazione non ha bisogno di memorizzare o interagire con i dettagli della carta del cliente.
Potresti aver notato nel file blade che abbiamo incluso il card.jsfile. Crea questo file JS nella directory pubblica e aggiungi il codice seguente.
js/card.js
// Create a Stripe client.
var stripe = Stripe(publishable_key);

// Create an instance of Elements.
var elements = stripe.elements();

// Custom styling can be passed to options when creating an Element.
// (Note that this demo uses a wider set of styles than the guide below.)
var style = {
    base: {
        color: '#32325d',
        fontFamily: '"Helvetica Neue", Helvetica, sans-serif',
        fontSmoothing: 'antialiased',
        fontSize: '16px',
        '::placeholder': {
            color: '#aab7c4'
        }
    },
    invalid: {
        color: '#fa755a',
        iconColor: '#fa755a'
    }
};

// Create an instance of the card Element.
var card = elements.create('card', {style: style});

// Add an instance of the card Element into the `card-element` <div>.
card.mount('#card-element');

// Handle real-time validation errors from the card Element.
card.addEventListener('change', function(event) {
    var displayError = document.getElementById('card-errors');
    if (event.error) {
        displayError.textContent = event.error.message;
    } else {
        displayError.textContent = '';
    }
});

// Handle form submission.
var form = document.getElementById('payment-form');
form.addEventListener('submit', function(event) {
    event.preventDefault();

    stripe.createToken(card).then(function(result) {
        if (result.error) {
            // Inform the user if there was an error.
            var errorElement = document.getElementById('card-errors');
            errorElement.textContent = result.error.message;
        } else {
            // Send the token to your server.
            stripeTokenHandler(result.token);
        }
    });
});

// Submit the form with the token ID.
function stripeTokenHandler(token) {
    // Insert the token ID into the form so it gets submitted to the server
    var form = document.getElementById('payment-form');
    var hiddenInput = document.createElement('input');
    hiddenInput.setAttribute('type', 'hidden');
    hiddenInput.setAttribute('name', 'stripeToken');
    hiddenInput.setAttribute('value', token.id);
    form.appendChild(hiddenInput);

    // Submit the form
    form.submit();
}
Il file della lama ha anche incluso il style.cssfile. Crea style.cssall’interno della cartella pubblica. Questo CSS avrà il codice seguente.
css/style.css
.StripeElement {
    box-sizing: border-box;

    height: 40px;

    padding: 10px 12px;

    border: 1px solid transparent;
    border-radius: 4px;
    background-color: white;

    box-shadow: 0 1px 3px 0 #e6ebf1;
    -webkit-transition: box-shadow 150ms ease;
    transition: box-shadow 150ms ease;
}

.StripeElement--focus {
    box-shadow: 0 1px 3px 0 #cfd7df;
}

.StripeElement--invalid {
    border-color: #fa755a;
}

.StripeElement--webkit-autofill {
    background-color: #fefde5 !important;
}
Stripe fornisce diversi tipi di elementi dell’interfaccia utente per creare un modulo di pagamento con i dettagli della carta di credito. Per saperne di più sulla loro documentazione.
Integrazione del gateway di pagamento Stripe in Laravel
Abbiamo impostato tutto con la configurazione richiesta. Ora possiamo procedere e integrare il gateway di pagamento Stripe in Laravel. Esegui il comando seguente per installare la libreria Omnipay nel tuo progetto.
composer require league/omnipay omnipay/stripePer chiamare il file blade e addebitare la transazione creare un PaymentControllerutilizzando il comando artigiano:
php artisan make:controller PaymentControllerPoiché dovremmo memorizzare i dettagli della transazione nel database, creare un modello Paymentassociato alla tabella dei pagamenti nel database.
php artisan make:model PaymentInfine, PaymentController.phpavrà il seguente codice che addebita la transazione e inserirà i dettagli della transazione nel tuo database.
PaymentController.php
<?php

namespace AppHttpControllers;

use IlluminateHttpRequest;
use OmnipayOmnipay;
use AppModelsPayment;

class PaymentController extends Controller
{
    public function index()
    {
        return view('payment');
    }

    public function charge(Request $request)
    {
        if ($request->input('stripeToken')) {

            $gateway = Omnipay::create('Stripe');
            $gateway->setApiKey(env('STRIPE_SECRET_KEY'));

            $token = $request->input('stripeToken');

            $response = $gateway->purchase([
                'amount' => $request->input('amount'),
                'currency' => env('STRIPE_CURRENCY'),
                'token' => $token,
            ])->send();

            if ($response->isSuccessful()) {
                // payment was successful: insert transaction data into the database
                $arr_payment_data = $response->getData();

                $isPaymentExist = Payment::where('payment_id', $arr_payment_data['id'])->first();

                if(!$isPaymentExist)
                {
                    $payment = new Payment;
                    $payment->payment_id = $arr_payment_data['id'];
                    $payment->payer_email = $request->input('email');
                    $payment->amount = $arr_payment_data['amount']/100;
                    $payment->currency = env('STRIPE_CURRENCY');
                    $payment->payment_status = $arr_payment_data['status'];
                    $payment->save();
                }

                return "Payment is successful. Your payment id is: ". $arr_payment_data['id'];
            } else {
                // payment failed: display message to customer
                return $response->getMessage();
            }
        }
    }
}
Per la modalità sandbox, Stripe fornisce carte di credito fittizie per testare una transazione.
Una volta terminato il test della modalità sandbox, sostituisci le tue chiavi API di test con quelle live e la tua applicazione inizierà ad accettare automaticamente pagamenti reali.
Questo è tutto! Hai finito con l’integrazione del gateway di pagamento Stripe in Laravel. Mi piacerebbe sentire i tuoi pensieri e suggerimenti nella sezione commenti qui sotto.
articoli Correlati
- Integrazione del gateway di pagamento PayPal in Laravel
- Integrazione del gateway di pagamento Authorize.Net in Laravel
- Integrazione del gateway di pagamento PayKun in Laravel